VSoft Technologies Blogs

rss

VSoft Technologies Blogs - posts about our products and software development.

The problem

Windows 11 24H2 breaks scripting in FinalBuilder and Automise. You will see a range of different errors depending on your scripts or the actions you use (some actions use jscript).

The cause

Windows 24h2 enables a policy by default that causes JScript.dll (the com dll) to load JScript9Legacy.dll rather than JScript9.dll

JScript9Legacy.dll is a replacement engine using Chakra - which is an odd choice since it seems abandoned since Edge moved to using chromium. The reason they did this was because of a security issue - which is understandable - but unforutnately it introduces a whole host of bugs they do not seem to interested in fixing (I guess it works for them). 

This issue even affects some of Microsoft's own applications (like Visual Studio)

The work around

The workaround is to disable the policy

Run regedit.

navigate to (for all users) :

HKEY_LOCAL_MACHINE\SOFTWARE\Policies\Microsoft\Internet Explorer\Main

or (for the current user only)

HKEY_CURRENT_USER\SOFTWARE\Policies\Microsoft\Internet Explorer\Main

Note these keys did not exist on my machine, so I added them.

Right click the Main key and select New DWORD (32-bit) Value, name the new value JScriptReplacement and the value to 0.

Restart FinalBuilder (no need to reboot).

Obviously, this is not ideal - we have been looking to replace JScript for some time - unfortunately so far our efforts have not resulted in something that is 100% backwards compatible - so we still have some work to do in this area.

Throughout the lifespan of FinalBuilder and Automise, we have worked very hard to avoid breaking changes - however sometimes they are unavoidable.

Today's updates to FinalBuilder 8 and Automise 5 have a breaking change in the SSH Batch Execute action. Previously, this action would manage it's own connect/disconnect - the breaking change is this action now requires separate SSH Connect/Disconnect actions. 

The reason for this is complicated, but it was brought about by us changing the client library we use for the SSH actions. The previous client library had too many issues that we were unable to work around. The most annoying example - the actions would not work correctly/reliably with openssh running on windows servers. We did try to fix this issue, but in the end the only viable option was to replace the library (something we were planning to do in the future anyway).  The new library (Rebex) is much more stable and performant. We plan to re-implement the SFTP actions (which have issues with some servers) with this library in a future update.

We have been using a build with these changes in production for some time now to dogfood these changes. 

To use the  SSH Batch Execute action, add an SSH Connect action before it and an SSH Disconnect after, set the connection name on the SSH Batch Execute and SSH Disconnect to the name of the new SSH Connect action's connection name and you should be all set.

If you experience any issues with the SSH actions in these new updates let us know (with as much info as you can about the server and action settings). 

50% OFF. No, that’s not a typo! Our first ever Black Friday sale - 50% off all new licenses - valid to midnight Tues 28th Nov (UTC).

No coupon code required, the store will apply the discount automatically.

Update Nov 2024

Whilst the content of this post is as valid today as it was originally, we became frustrated with being limited to signing on one machine. That meant our build agents were doing a lot of copying of files to and from the server with the token.

Our solution was to build a Code Signing Server - Signotaur - keep reading and then take a look at how Signotaur solves the problems we talk about in this post.


Big changes are coming for code signing certificates in 2023. New and reissued publicly trusted organisation validation (OV) and individual validation (IV) code signing certificates will have to be issued or stored on preconfigured secure hardware by the issuing Certificate Authority (CA) and the device must meet FIPS 140 Level 2, Common Criteria EAL 4+ or equivalent security standards.

This is already the case for EV (Extended Validation) certificates, and it presents some problems in an automated build environment. In this post we'll take a look at the issues with hardware-based certificates and how to work around them. 

Why is this change necessary?

If you work in IT, you will have heard or read about the SolarWinds supply chain hack. It was a big deal. It's more common than we might think - in February 2022 NVIDIA had their code signing certificates stolen and they were used to sign malware (those certificates have since expired).

These (and other) episodes made many in the industry (Microsoft in particular) very nervous. Trust is a big deal when it comes to certificates, and that is certainly the case when it comes to certificate issuance, but there is not a lot of trust in how those certificates are secured by the developers using them. Ask anyone who has done the merry validation dance with a CA, it's not that easy to get a code signing certificate these days. With that in mind, the CA/Browser forum adopted a proposal to change the requirements for how issued certificates are stored.

The change makes a lot of sense - it's much harder to steal hardware than it is to steal files. 

What does this mean

From 1 June 2023, all new and reissued publicly trusted OV and IV code signing certificates will have to be issued or stored on a pre-configured secure hardware device by the issuing certificate authority (CA) and the device must meet FIPS 140 Level 2, Common Criteria EAL 4+ or equivalent security standards. 

Existing OV/IV certificates will continue to work, but if you need your certificate to be reissued you may encounter issues due to key size requirements changing (so don't lose your certificate). The reality is that most certificate providers have already switched to issuing certificates on tokens (or discontinued selling OV/IV certificates). This is the end of simply downloading a pfx. 

What are these hardware devices 

These devices fall broadly into 3 categories:

Network-attached Hardware Security Modules (HSM)
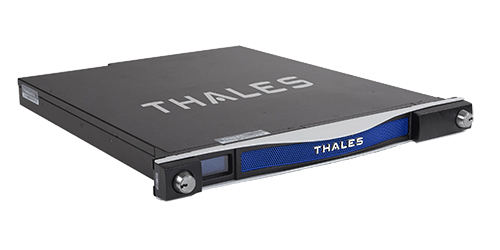
HSM's in this class bring a lot of benefits and functionality (like key usage audit logs) - code signing is just part of that. These devices are not cheap - usually in the "if you have to ask you probably can't afford" price range! There's a reason for that steep price though. They are designed to be ultra-secure and tamper proof - open the lid and you will likely lock it up or brick it. 

CA's will charge you a premium if you BYOD (bring your own device) - expect an audit fee of around $500 - or you can employ your own suitably qualified auditor (no idea what the criteria is for that but it sounds expensive). You will also have to deal with creating a Certificate Signing Request (CSR) to send to the CA. The process varies depending on the device, and the CA websites don't offer much guidance there. 

Cloud HSM's

Azure, AWS, Google and others provide cloud HSM's, a service layer in front of network-attached HSM's - you basically rent time/space on them. They typically charge a monthly fee and then a fee per cryptographic operation. CA's charge a hefty fee to create certificates for use on these services - up to $1200 - and on top of that some CA's charge per number of signings per year (no idea how they police that). You also need to do some work to configure secure access to the HSM. These services make sense if you are already running on the cloud. Like other HSM's you will need to create a CSR to send to the CA during the order/validation process

SSL.com offer an eSigner cloud-based service (they are also a CA), but the prices will make you think twice about code signing: USD $100 per month for 10 signings, plus $10 for each additional signing. We sign every build that might escape the building and each build has several files that need signing! 

USB tokens

In my research so far, the most common USB token is the Gemalto/Thales SafeNet token. The only other ones I have encountered are Yubikey (only SSL.com seems to be using those) and Certum (for which I could find very little info on the client software). The token tends to be included in the price of the certificate (I did see one case where it was not). You do not need to create a CSR (unless you are using your own existing token) as the CA loads the certificate on the device before posting it to you. The one I have (from Digicert) is a Safenet token. It's already obsolete and cannot be used for new certificates as it doesn't support the larger key size required now (newer model required).  

Locked In

One thing to note about all the possible hardware devices, whether it's yours or one you rent, is that once a certificate is installed on that device, it's private key cannot be exported. So if you decide the cloud service you are using is too expensive and want to move, well it's time for a new certificate. 

Some CA's say they cannot reissue EV's on USB tokens, whilst others provide a procedure - it's likely you will be up for a new token cost and more verification hoops to jump through. So don't lose or damage it! 

In the rest of this post, I'm only going to cover USB tokens. If you have access to network or cloud HSM's then you are probably well past this point.  

So, what's the problem then?

Different USB tokens might use different client software/drivers - but they all have one thing in common - the USB token needs to be present (i.e. plugged in to the machine) when code signing. This seemingly innocuous little USB token (which looks just like a memory stick) needs to be physically secure. If someone walks past your machine and takes it (likely thinking it's a memory stick), well you are up a creek without a paddle. My SafeNet token has a bright blue LED on the end that just screams "Take me!". Our build servers are colocated at a data centre - so leaving things like USB devices plugged in is asking for trouble. It's not like I can walk over and plug it in when needed (every day!). The data center is 300km from where I live/work.

Add to this that build machines are typically virtual, so you are into the realm of USB passthrough. If you use Hyper-V Server (as we do), well you are bang out of luck.. not supported. I have heard that VMWare ESXI supports it just fine but have never used it. I tested with XCP-ng and did get it working, but it was a major hassle to configure (reams of commands and copying of guids).

USB - Remotely

Fortunately, there are alternatives to USB passthrough. I looked at a bunch of USB remoting products (USB over IP/UDP), and after poor results with most, I found one that works. In fact it works incredibly well, with much better pricing than the others.

That product is VirtualHere (VH). Of all the vendors I contacted, they were the only one who actually responded and answered the question I asked - "Does it support code signing tokens?". The author responded, "Actually I use my (Digicert) JC Token via VirtualHere to sign VirtualHere when I build VirtualHere inside a VM." Good enough for me to give it a try!

The VH Server runs on Windows, Linux, MacOS, a bunch of NAS servers, even a Raspberry Pi! The server licence is locked to the host machine, so if you decide to move the USB token to another host you will need to purchase another license - but at USD$49 that probably won't break the bank!

I installed the VH server software on my XCP-ng host - installation was trivial and took all of 2 minutes (I'm no Linux expert). I then plugged the USB token in (the server is in my mini rack at home) and installed the VirtualHere client software on my Windows machine.

The VH client can auto detect servers, however in my case the two machines were on different subnets, so I had to manually specify it. With the trial version, a message box shows up when it first connects. The client immediately showed a tree of the USB devices plugged into the server. The SafeNet token shows up as Token JC, right-click on it and select "Auto use this device" so it connects automatically. When I did this, the familiar Windows sound indicated a device had plugged in. I already had the SafeNet software installed so it didn't prompt me for drivers etc.
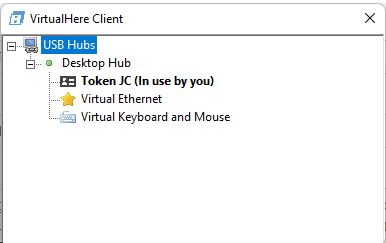
The last step in this USB remoting journey was to install the client as a service (right click on the USB Hubs node). This can only connect to licensed servers, so leave this step until you have purchased.

NOTE : I didn't make it clear before, but the VH client and token client software need to be installed on the machine where the signing takes place, ie your build machine or build agent machine. 

Prompting for Passwords

Another issue with the USB tokens being present during code signing, is they also expect a human to be present - a password prompt is shown. That flies in the face of conventional wisdom - automate all the things!

Fortunately, for the SafeNet token at least, there is a work around for this.

Open the Safenet Authentication Client Tools, click on the Advanced View button (the gear). You may be prompted for the token password if you haven't already entered it. In the tree on the left, right-click on the certificate (under User certificates) and select Export certificate. Just to be clear here, this is the certificate without the private key (which stays on the token) - you can't use this exported certificate on a machine that does not have access to the USB token. 
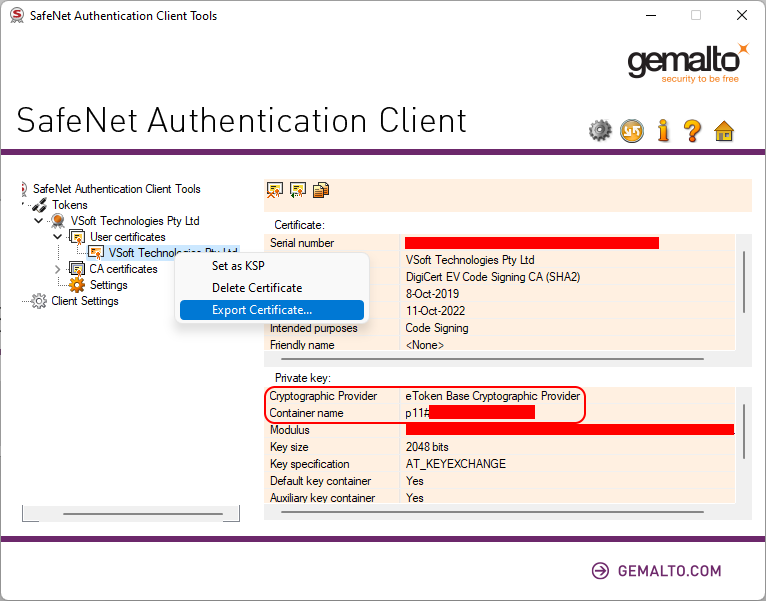
In the certificate view, under Private Key, take note of the Cryptographic Provider value (likely "eToken Base Cryptographic Provider" and the Container Name (p11#xxxxxxxxxxx). You will have to manually type them out somewhere as it doesn't support the clipboard. Save those values somewhere - as you will need them in your build process for code signing.

Whilst still in the Client tools, select Client Settings and go to the Advance tab, check the "Enable single Login" and "Enable single Logon for PKCS#11." options, and set Automatic Logoff to Never - then hit Save. You can close the client now.

Code Signing

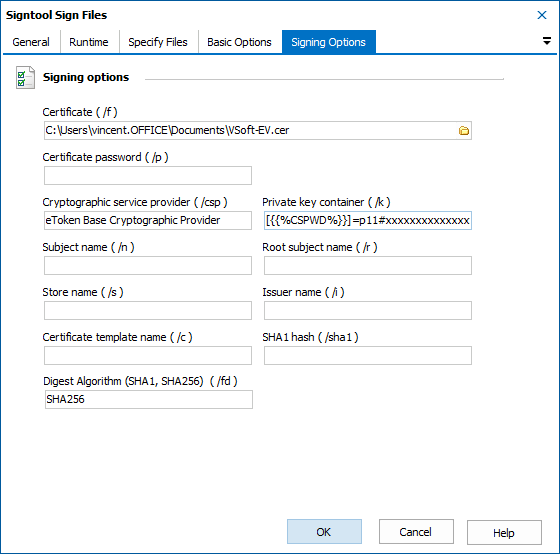
With all that done, we can use Signtool action in FinalBuilder. The Signing option tab is where those values we saved earlier come into play.

The only difficult one is the Private Key container. Fortunately, some clever person on StackOverflow figure out the required format:

[{{%CSPWD%}}]=p11#xxxxxxxxxx

I have used a variable CSPWD for the token password.
That's it. In my tests I have run FinalBuilder from the Windows task scheduler while logged out, and from a Continua CI build agent service (again while logged out) and it worked in both instances. I did a bunch of login/out/reboot testing and it continued to work. VirtualHere has been flawless. The next step is to configure our CI agents to access the USB token over VPN. Sadly our EV token is about to expire (and we never used it once in production, our OV cert still has another year left) - so I first have to jump through the validation hoops to get a new one.

When using this technique on a CI server, you will need to take care that only one build at a time is using the token. In Continua CI, that is trivial to achieve using a shared resource lock.

I would love to test out some of the cloud HSM services too, but purchasing a certificate for each one is too rich for me. If you are using any of those with a cloud-based HSM, jump on our forums and let us know your experiences. If you experiment with or get up and running using VH let us know how it went - I might do a follow up post as we all gain more experience with usb tokens and code signing.

Warning (added 19 Oct 2022)

I probably should have pointed out that most tokens are configured to lock you out after too many authentication failures. So if you are getting auth failures when setting this up, stop, and manually login to the token to reset the failed count. 

Rant

CA's (and their resellers) have some of the worst websites I have ever had the displeasure of reading. Pages and pages of useless or contradictory information with links promising more information that take you around in circles. Grrrrr. 

If you are using Continua for your CI, (and if not why not?) ensure that you check out System Server Properties. These allow access to global settings which do not fit on any existing page.

They can be used to configure several aspects of the UI and build process to fit your team preferences. This could simply be the number items to show per page on each of the dashboard views (Server.ProjectsView.*.PageSize), or more complex patterns for detecting errors and warnings in actions settings (Actions.Messages.*Patterns). Some system server properties are rarely needed, but some can be considered essential, such as Server.HostUrl which can be used to ensure the links in notifications go to the correct external host name.

We have recently added some new server properties which allow you to control the tabs on the Queue Options dialog (Server.QueueOptionsDialog.*) and create a banner for displaying a message to all (or a subset of) users (Server.Banner.*).

Here is the result of changing Server.QueueOptionsDialog.TabSequence from "Variables,Repositories,Options"

Queue Options dialog tabs - Variables first

to "Repositories,Variables,Options".

Queue Options dialog tabs - Variables first


This is what happens to an existing banner when you change the Server.Banner.MessageType from "Information"

Information Banner

to "Warning".

Warning Banner

Server properties can be edited on the "Continua Server - Properties" page located in the "Administration" section of Continua CI. See our documentation for details on all the currently available server properties.

In December 2019, I blogged about a package manager for Delphi that I am working on. This post is a progress update that shows where it's at and what's left to do to get to v1.

DPM Recap

For those not familiar with what I am trying to achieve here, I highly recommend reading my original Delphi Package Manager RFC post. In that post I detailed my ideas, and some of the challenges that Delphi presents when compared to other development environments.

In December 2019, the bare bones of DPM were there. We had a command line tool and that was it. We were able to create packages, install packages (and their dependencies) and restore them (restore ensures all referenced packages are present). Oh and we could list the available packages in our package feed (a folder).

IDE Integration

In the last 13 months there were around 175 commits to the DPM repository. In that time I have added an IDE plugin (that works in Delphi XE2 to 10.4). This involved the creation of several custom controls (I wasn't able to bend any existing ones to work how I wanted it to).

In addition to the work in the project repository, I also published several useful libraries that I needed for this project. DPM is now bootstrapped, to build DPM you need DPM, as it requires several libraries that are referenced as dpm packages.

In Nov 2020 I published the first alpha release that included an installer (code signed by VSoft Technologies) for installing both the command line tool and the IDE plugin (single installer, you can choose which IDE versions to install for). The installer allows you to install for the current user, or for all users (requires elevation to install).

I also did a zoom presentation about DPM to the Melbourne chapter of the Australian Delphi Users Group - a recording of that (long) presentation can be found here.

Adding IDE support for DPM was a massive undertaking. I had very little experience in developing Delphi IDE plugins (using the tools api) - and there were lots of subtle changes between delphi versions, getting things working correctly in 12 versions of Delphi was not easy. In particular, with the later versions of Delphi IDE that use VCL themes, getting things to look right (ie like a native part of the IDE) was a challenge.

The above image shows the installed packages for one of the projects in the project group, you get to this view by right clicking on the project node, or the DPM Packages node in the Project tree.

Note the view only shows the directly installed packages, not the transient dependencies - those you can see in the project tree under the DPM Packages node.

Before you can use DPM in the IDE, you need to configure a package source (a folder where your package files will live)

This can be done fron the command line

dpm sources add -name=local -source=path to the folder you created

Or from the IDE Settings

Compile during install

The most recent updates added support for compiling packages during first install. Packages need to declare how to build in their dspec file, and dpm will use that and call msbuild to compile the packages if needed. DPM also records a bill of materials file (package.bom) in the package cache so that it can tell whether the package needs to be recompiled or not.

On first install, packages that are being compiled during the install process will take a little longer, but on subsequent installs or restores, the process is almost instant (a few ms).

Prior to adding this feature, building dpm on our Continua CI build agents took 13 minutes, much of which was taken up with compiling the dpm packages that it references (in particular, earlier versions of Delphi were very slow with spring4d). Since updating dpm on our agents with the new version, the entire build process for DPM (console app and 12 versions of the IDE plugin and the installer) takes less than 2 minutes.

Missing features

Project group support

When installing packages, the dependency resolution code does not know about other projects in the project group, or what packages and versions they reference. This will be a problem for packages that include design time components that need to be loaded - the IDE can only load 1 version of a design time package. This is what I am currently working on.

Design time packages

DPM does not currently install design time packages into the IDE. This is dependent on project group support, so it's next on the list after project group support.

Package Updates

The ability to detect when package updates are available and make it easy to install those updates. There's an Updates tab in the IDE but it's non functional at this time.

Package Repository

In it's current state, DPM only supports folder based package feeds. This works fine, but it does have some limitations

  • Limted search abilities - limted to searching on the package filenames.
  • You have to download packages to a folder.
  • Package Authors have to host the package files somewhere (mine are under releases on their github projects).

I have made a start on the Package Repository, but not a lot of progress since I'm focusing on the client site right now.

Q & A

Is it usable?

In it's current state, it's only usable for non visual libraries. As I mentioned, the DPM projects all use DPM themselves, and we have DPM actions in FinalBuilder for running the Pack and Restore commands.

If you use any of my open source libraries like DUnitX, Delphi Mocks etc, I have created packages for all of those libraries, and also created mirror projects (just for hosting the package files) for some other popular libraries like Spring4D.

I would encourage library authors in particular to take a look and provide feedback.

Where can we find it?

DPM is an open source project on GitHub, the installer can be found under Releases (under each release, there is an Assets dropdown section).

What versions of Delphi does it support?

Delphi XE2 to 10.4.2 - note that we compile with the latest updates installed for each compiler version.

Why is it taking so long?

Yes, someone asked that recently! This is a side project, free and open source. My primary focus is on running my business and working on our products (that keeps the lights on).

Can we sponsor the project?

Not right now, however it's something I'll look at in the future.

Can we help?

Absolutely. Fork the project on GitHub and clone it to your dev machine and spend some time getting to know the source code. Before making any pull requests, create an issue on github to discuss your ideas and make sure we on the same wavelength!

We use many third-party Delphi libraries to build FinalBuilder and Automise, and that brings plenty of issues when upgrading compiler versions. I've been using Delphi since 1995, both as a developer and as a component vendor, I have learned a thing or two about creating libraries that I would like to share. These are all ideas that make life easier for users, and make it easy to migrate from one version of Delphi to another.

There's no hard and fast rules on how Delphi Libraries are supposed to be structured, these are just my preferences and things I have learned over the years. Hopefully this will help new and existing library authors.

Folder Structure

Keep the Source and the Packages in separate folders, this makes it easier to find the correct packages to compile, e.g :

\Source
\Packages
\Demos

Under Packages, create a folder for each compiler version your library supports, e.g:

\Packages\Rad Studio XE8
\Packages\Rad Studio 10.0
\Packages\Rad Studio 10.1

Package Names

Please, do not put the Delphi version in the package project names.

Bad!!!

MyProjectRun_D10_4.dproj
MyProjectDesign270.dproj

Good

MyProjectRun.dproj
MyProjectR.dproj
MyProjectDesign.dproj
MyProjectD.dproj

Why not put the compiler version in the package project name you might ask? Well the answer is that it makes upgrading compiler versions a major pain for users who link their projects with Runtime Packages (yes, that includes us).

The reason is that when you compile a package, it creates a packagename.dcp file and that is what your project references. So, if your package name is MyPackageRun_D10_4 then that is what will be added to projects that use it.

package MyOwnPackage;
//...
requires
  rtl,
  vcl,
  MyPackageRun_D10_4,
  AnotherPackage_Sydney,
  YetAnotherPackage_D104,
//  ...
        

When Delphi 10.5 comes out, guess what the user has to do to upgrade their projects.... Yep, replace that all those package references with 10.5 versions (and the multitude of suffixes). Multiply that by a number of projects and a number of libraries (each with potentially multiple runtime packages) and you can see why this might be a pain.

Now you might say, but we don't want 15 versions of MyPackageRun.bpl laying about on users machines, and you would be right. The solution to this is a feature that has been around since Delphi 6 (2001) - LIBSUFFIX.

LIBSUFFIX

Setting LIBSUFFIX (on the Description section of project settings) will append the specified suffix to the BPL file name. So a suffix of _D10_4 will result in a package :

MyPackageRun_D10_4.bpl

however, the DCP file will still be generated as :

MyPackageRun.dcp

Remember it's the dcp file that our projects reference (for linking) - so by keeping the dcp file the same for all delphi versions, upgrading to a new compiler version just got a whole lot easier!

So when Delphi 10.5 comes out in the future, all I need to do is install the packages, no changes to my projects.

Update : Someone pointed out that Delphi 10.4.1 support LIBSUFFIX $(Auto) - this will use the Delphi defined PackageVersion - which for 10.4 is 270. This is a nice addition as it makes upgrading the package projects simpler. Of course if you don't like the PackageVersion suffix and use a custom one, then this is not for you.

Use Explicit rebuild, not Rebuild as needed

Have you ever encountered the error

E2466 Never-build package 'XXX' requires always-build package 'YYY'
What this means is, a package, set to Expicit rebuild, references another package, set to 'Rebuild as needed', and it's a pain in the proverbial. Rebuild as needed is also referred to as Implicit Build - in dpk's you will see it as
{$IMPLICITBUILD ON}
If that "Rebuild as needed" package is not part of your project group, guess what, you get to waste time closing and opening projects trying to get it to compile.

I'm sure someone will correct me on this, but I cannot see a good reason to have "Rebuild as needed" set. I suspect this is a hangover from before the Delphi IDE allowed you to specify Project Dependencies and it slows down builds.

Use Search Paths for includes

I often see includes with either hard coded paths, or relative paths like this :

{$I '..\..\MyDefines.inc'}
        

That's great, if the installer delivers the files in the right place - but they often don't - I hit this issue today, where the package just would not compile. I eventually figured out that the relative path was wrong.

There's a simple fix for this, and that is to remove the path in the $I statement, and use the Project Search Paths feature instead.

Search Paths

I have also seen libraries where there are mulitple copies of the include file and they are slightly different!

Mark packages as Runtime only or Designtime only

Some libraries have their packages marked as "Runtime and Designtime" (the default) - the impact of this is only minor, but it's a pet peeve of mine. The Delphi IDE (in recent versions at least) provides a nice indication of whether packages are runtime or designtime in the project tree, and for designtime packages, whether they are installed.

This makes it simple for me to determine which ones need to be installed or not.

Not Installed

Not Installed

Installed

Installed

Summing up

One of the major reasons people do not upgrade Delphi versions is because it's too hard to deal with the third party libraries and all the changes required just to get to the point of compiling. That eventually results in a lack of Delphi sales which results in a lack of investment in Delphi which feeds back into.... well you get the idea ;)

Making third party libraries easier to work with in Delphi has been a bit of a crusade for me, I've been working on this for a while now, and I'm getting closer to a solution - DPM - A package manager for Delphi - if you are a library author, I encourage you to take a look. For examples on how to create a package spec (dspec) take a look at our open source projects https://github.com/vsoftTechnologies/

We are delighted to announce that version 1.9.2 of Continua CI has passed through the beta and release candidate stages, and has now been released. Here is a reminder of the new features in v1.9.2:

Export and Import

Users with Configuration Edit permissions can now export one or more project configurations to a YAML or JSON file. This may be for backup, versioning or migration to another server.

The export wizard has a number of steps allowing selection of one or more configurations, and also any related repositories, variables and shared resources.

Export Wizard - Configuration Selection

The configuration details can be exported to YAML or JSON file formats, according to your preferences for readability and differencing.

Export Wizard - File Details

The resultant file is downloaded to your computer, allowing you to file it away until you need it.

Export Wizard - Downloaded File

Export Wizard - YAML

The import wizard also consists of several steps, allowing users with Project Edit permissions to upload a file, ...

Import Wizard - File Selection

choose which items in the file to import and whether to overwrite any existing matching items of create new items.

Import Wizard - Configuration Selection

The import runs in a transaction, so if any modified file content fails validation it will rollback...

Import Wizard - Import Failed

allowing you to make changes and retry.

Export Wizard - Import Complete

Requeuing Stages

Sometimes a build stage may fail due to external influences. It could be that a file server was offline, network connectivity was down, or a file was locked for access. If it has taken several long stages to get to this point, then having to run the whole build again from the start can be a pain.

The last stage of a completed build can now be requeued, providing that it has failed, stopped or errored, and the server workspace is intact.

If no parts of the server workspace have been removed by the cleanup process, then a Requeue Stage button will be shown after the last stage in the Stages list on the Build page.

Action list categories

This allows you to requeue and execute the stage again!

Action list search

You can also optionally make changes to the stage actions and requeue the stage with the latest changes.

Stages

Multiple Daily Cleanup Rules

Every build that is executed within Continua CI stores information in the server's workspace, such as artifacts and build logs, and entries in the database. These by-products are vital for executing your build process and tracking build information, however, they can also take up considerable disk space over time and have a negative impact on database performance. The cleanup settings define the shelf life for the build by-products.

Up until now, the cleanup settings have been quite limited - you could set up a single policy per configuration defining the build age and build limits for cleaning up either the database, the workspace, or both. Often, however you would want to cleanup the workspace files to save space, well before removing the build from the database. This update allows you to define multiple cleanup rules, with different shelf lives for each type of build by-product.

Cleanup rules

Each rule can include one or more by-product to clean up.

Cleanup rules dialog

Download the installers for Continua CI v1.9.2 from the Downloads page

We are delighted to announce a new beta release of Continua CI. We have added the following new features:

Export and Import

Administrators can now export one or more project configurations to a YAML or JSON file. This may be for backup, versioning or migration to another server.

The export wizard has a number of steps allowing selection of one or more configurations, and also any related repositories, variables and shared resources.

Export Wizard - Configuration Selection

The configuration details can be exported to YAML or JSON file formats, according to your preferences for readability and differencing.

Export Wizard - File Details

The resultant file is downloaded to your computer, allowing you to file it away until you need it.

Export Wizard - Downloaded File

Export Wizard - YAML

The import wizard also consists of several steps, allowing you to upload a file, ...

Import Wizard - File Selection

choose which items in the file to import and whether to overwrite any existing matching items of create new items.

Import Wizard - Configuration Selection

The import runs in a transaction, so if any modified file content fails validation it will rollback...

Import Wizard - Import Failed

allowing you to make changes and retry.

Export Wizard - Import Complete

Requeuing Stages

Sometimes a build stage may fail due to external influences. It could be that a file server was offline, network connectivity was down, or a file was locked for access. If it has taken several long stages to get to this point, then having to run the whole build again from the start can be a pain.

The last stage of a completed build can now be requeued, providing that it has failed, stopped or errored, and the server workspace is intact.

If no parts of the server workspace have been removed by the cleanup process, then a Requeue Stage button will be shown after the last stage in the Stages list on the Build page.

Action list categories

This allows you to requeue and execute the stage again!

Action list search

You can also optionally make changes to the stage actions and requeue the stage with the latest changes.

Stages

Multiple Daily Cleanup Rules

Every build that is executed within Continua CI stores information in the server's workspace, such as artifacts and build logs, and entries in the database. These by-products are vital for executing your build process and tracking build information, however, they can also take up considerable disk space over time and have a negative impact on database performance. The cleanup settings define the shelf life for the build by-products.

Up until now, the cleanup settings have been quite limited - you could set up a single policy per configuration defining the build age and build limits for cleaning up either the database, the workspace, or both. Often, however you would want to cleanup the workspace files to save space, well before removing the build from the database. This update allows you to define multiple cleanup rules, with different shelf lives for each type of build by-product.

Cleanup rules

Each rule can include one or more by-product to clean up.

Cleanup rules dialog

Download the installers for Continua CI v1.9.2 Beta from the Downloads page

Generally, at VSoft, we like to build. So we build every commit and this allows us to look back at our build history and see which changes caused the build to fail. We use manual stage promotion to prevent every build being released until we decide that it is ready to go.

Build promotion

Many teams like to trigger a build at the end of each day, or during the night, compiling the work for the day in one single package.

The obvious choice for this scenario is the Daily Trigger. This can be set to run a build at a specific time every day, or just weekdays - even just weekends for those with alternative lifestyles.

Build promotion

But what if the team is just having a design day, is off on a team building excursion or, perish the thought, a day of meetings! No commits are made, but the daily build still runs even though there are no changes. One possible solution is to use a Discard condition.

Discard condition

This will prevent the build running if there are no changes since the last build.

Build being discarded

Another option has been added to Continua CI recently. The Quiet Period setting on Repository Triggers now allows you to enter an End Time rather than an Interval.

Quiet period end time on repository trigger

Any builds triggered from a repository change are then queued right through the day until the specified end time. Any additional changes added to the configuration repositories during the day are added to the queued build, and when the end time comes up, the build executes on the latest changeset.

Build waiting on quiet period end time

If you're going home earlier than the end time and want stuff deployed already, you can swiftly end the quiet period at the click of a button. Using a repository trigger in this way means that you can ignore changes to some files, changesets with a specific comment, or commits from certain users.

Trigger with user exclusion

- like that hands-on manager who thinks of his commit count as a key performance indicator.

'When the PM fixes a bug' cartoon by commitstrip.com